Getting Started[]
Check your device requirements and start the game from your browser or any of the standalone clients.
Creating an Account[]
When you start the game, the Login/Register window will appear.
- World Select: This is used to pick a World you will start in, with information on how many players are in the selected World. You don't need to change this unless it says "Disconnected" below Login/Register.
- World 3 is for Premium players. Access to this World can be bought through the MOS Market.
- User: Type in your desired account name. This is the name other players will know you by.
- The game will accept spaces and special characters (punctuation and underscores) but no letters of your name will be capitalized. If you type in "PlayerName", your in-game name will appear as <playername>.
- If you later decide you don't like your in-game name, it can be changed through the use of an item from the MOS Market.
- If you don't want to spend money, make a new account.
- Password: Type in your desired password.
- Once inside the game, open the Menu-- the left-most of your top, right-hand icons-- and from there open the Player info panel. In the default tab, enter your e-mail address. If you do not do this, you will not be able to recover your password if you forget it.
- Forgot your password but remember to set an e-mail address? Click here for the official instructions on how to reset your password.
- Login/Register: Click this button once you've completed all of the above steps.
- Connected/Disconnected: Displays your connection status to selected World.
Controls[]
You can move your character by clicking on the location you want to move to. If you click on an interactive object, like a NPC or an ore vein, you will automatically walk to it and begin interacting with it. You can also use the "W, A, S, D" or arrow keys to move.
Some objects require you to equip an item before you can interact with it (you need to equip an Iron Pickaxe before mining ore or a Steel Pickaxe before mining a vein). To equip an item left click on it in your inventory. If it is equipped, it will have a yellow border around it.
Left Clicking on consumable items will use them-- but be careful, as items will be consumed even if it does not confer any benefit.
- Eating Food while at full health will still consume the food.
- Using a Potion while under the influence of another potion affecting the same stat will override the old potion but will not stack the effect.
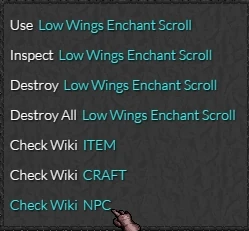
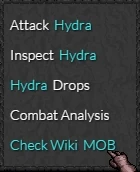
Right clicking will bring up additional options for both items and the environment. An item can be used, inspected, or destroyed (this includes loot crates in the environment). An object in the environment can be interacted with or inspected. Enabling Mods adds many more useful options. You can check items in the in-game /wiki, get a detailed Combat Analysis between you and a mob, and see what items you can get from a mob or resource by using Check Drops.
You can trade with some NPCs. To buy or sell an item, click on the NPC to access their store, then left click on an item to select it. Click "buy", "sell", or "sell all" at the bottom of the Shop window.
- The name of the item you have selected should be at the top left of the Shop window.
- Some items can only be sold, not bought, at an NPC's store.
- If an item can only be sold, the small number to the top right on an item's item box will always display a zero.
- Right/long click an NPC and select Check Wiki MOB to see a list of the items they sell.

- If you would like to check through the in-game wiki's NPC section-- helpful for finding which NPC sells certain items without having to run around to each NPC-- items that an NPC sells have a pale gray background; items that they buy but don't sell have no background.
Clicking on the minimap at the top left of the game screen will bring up a map of the entire area. If you have mods enabled, it will also show the locations of resources and mobs. Also after loading /mods, World Map can be accessed after you open the minimap. Note: If you are playing the game through Steam, /mods are loaded and enabled by default.
You can keep your Inventory window expanded by clicking on it. Click on it again to minmize it. Upon minimizing, the Inventory window will remain open until you move your pointer off of the Inventory icon.
Tutorial Island[]
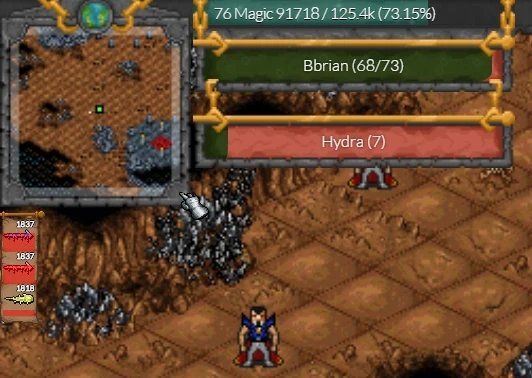
You should choose one of the Combat Builds before doing any combat and set your Fighting Mode accordingly. It is set to Controlled by default. Fighting mode is set in the menu—the left-most icon on the top right part of the screen.
It is also recommended that you turn on "Auto run away from fights"—also located in the Menu—at the beginning of the game. Doing so will allow you get in 4 attacks for every 3 times a monster hits you. This also stops combat after both you and the monster take 3 actions each, so you will have to re-initiate combat each time this happens. Keep a close watch on your HP while fighting as you can not heal during fights. Only after you run away can you eat food. This method may mean slower battles but it will allow you to take less damage an will decrease the risk of death.

Don't use your Repeat Quest Permission—either the one everyone gets on Tutorial Island or any you may get as drops from monsters. Since you won't have a worthwhile use of such a rare item for a long time, you're better off selling it on the Player Market once you've finished Tutorial Island.
It is highly recommended that you enable the Mods. They add many quality of life features that are practically mandatory to use. Note: If you are playing the game through Steam, Mods are enabled by default.
In order to pass through each gate on Tutorial Island you must first complete the room's requirements, as given to you by the NPC(s) in each room. Once you pass through a gate you cannot return to any of the previous rooms unless you die, in which case you will be brought back to the very first room. Your first death, at least on Tutorial Island, is penalty-free—you won't lose any items. There are only two combat rooms, though, which are the second and third rooms. Beware: despite having 0 Strength or Accuracy, the Training Dummy can still deal damage and kill you if your HP is low.
Don't linger on Tutorial Island—do your minimum requirements and then move on; you'll have more and better opportunities when you take the ship from Tutorial Island to Dorpat. Don't worry about forgetting how to do anything—all the same instructors and instructions are available in Dorpat if you ever need a refresher. The only differences are that the Dorpat instructors don't give you free items and Dorpat's Fishing Master buys a wider range of items than the Fishing Master on Tutorial Island—if you've got Raw or Cooked Frogs, you'll be able to sell them in Dorpat.
Exceptions to speeding through Tutorial Island are as follows:
- The Forging room. After your forge your first Bronze Dagger, talk to the instructor again to get the materials for another Bronze Dagger. Don't actually make another Bronze Dagger, though, unless the second exception is in effect or if you want coins as fast as possible, because a single Bronze Bar is worth more than twice as much as a Bronze Dagger on the Player Market.
- A 2x XP event is happening. If there's an ongoing 2x XP event, there'll be a yellow timer box up by your Inventory panel. You can also type
/xpinto the chat box to check if there's an ongoing XP event. If there is a 2x XP event occurring, make the second Bronze Dagger if you're still in the Forging room and then get yourself to the Alchemy room if you haven't passed it yet (the one with the sand pits). Now make as many Empty Small Vials as you can while the 2x XP event is going on—this is the shortest distance you will ever have between sand pit and furnace, and also the safest route from sand to furnace you'll have for a while. Additionally, an Empty Small Vial is the most valuable item you can take off of Tutorial Island*. If you do make vials, you can sell them fairly easily for 150-200 coins on the Player Market or hold onto them—if you want to get into Farming you're going to need a lot of vials.
- =Except for the higher grades of Uncut Superior, High, and Medium Grade Crystals, but you'll be mining all day if you're after an inventory full of them and there's no benefit to doing that because Uncut Crystals don't need a Furnace, Campfire, Anvil, or the like, so distance from the source to any given location isn't an issue.
Dorpat[]
After you complete Tutorial Island you will find yourself in Dorpat. Once there, all game options are available to you. You can start doing combat, gathering, or crafting.
- It's worth noting that even if you might think that it's cheapest to do everything all by yourself-- it is not. It is best to specialize early on.

All Tutorial Island teachers are also located in Dorpat and can be used to refresh you on their instructions.
- If you accidentally lose your resource-gathering tools you can get another set as a drop from killing Tools Boxes underneath Dorpat in the dungeon. The Tool Boxes also drop a fifth tool that you weren't given on Tutorial Island-- the Chisel. You'll need one if you want to cut gems.
To start with, you should check out the Making Coins section below as well as the New Player Guide, and also go talk with Dorpat's Quest Master-- who's standing more or less between the Campfire and the Furnace-- in order to try and pick up a Quest.
- Early on the Quest Master's list of Tasks may is likely to contain Tasks you can't complete.
- Don't worry, just do the ones that help you.
- As you complete Tasks and get points the Tasks offered will get better.
- You'll want to start with the Quest Master early because sometimes Tasks give MOS as a reward.
Making Coins[]
The most common way of making coins is by using the Market to sell items to other players, accessed through your town Chest.
NPCs only buy items listed in their trade menu and nothing else. Check the in-game wiki using the command /wiki to find out which NPCs buy the items you are selling. However it is recommended to check the Market first to see if other players are buying the items at higher prices than what the NPCs are offering. Others ways of making coins are doing Quests, Party Dungeons, and through Daily Login Rewards. Mobs don't drop coins, only items.
A good way to make some coin starting out is to mine and sell Sand to players.
- -- as well as any Uncut Crystals you find while mining Sand
- -- Feathers, reselling seeds, and monster loot gained through combat.
Another way to get coins that doesn't take too long is by Fishing and selling your fish. When fishing, you also have a small chance to find Sunken Treasure, worth some money on the Market, it's a food source and can make some money.
If you want to specialize in Forging, you can forge and sell Bronze Bars for money. If you do want to specialize in forging, spend most of your time mining Copper and Tin, then forge Bronze Bars during a 2x XP Event.
- Unlike all the other easy ways to make coins, forging comes with the risk of losing your materials and not getting XP.
- By forging during 2x XP events you can level up twice as fast, and with each level your chance of successfully forging Bronze Bars increases.
It is highly recommended to get one of the Skill Donkeys from the pet trader in Dorpat as soon as possible as they provide 8 extra inventory slots immediately, with an additional 8 inventory slots through leveling up the pet. They require you to have reached Level 20 of the skill in their name but will store any item, not just items related to that skill.
Yes, there is/was a player who sells Tomatoes for 10000 coins each. Those sales are used to fund giveaways that that player hosts. Tomatoes are not worth 10000 coins.
Buying an Island[]
You cannot train fletching, carpentry, breeding, or farming until you buy an Island Deed (unless you use captcha points).
- You can buy one from the Dorpat Farmer NPC for 35,000 coins. Refer to the other guides for more information on these skills.
Additional Resources[]
See: Guides
Quick & Easy Tips From a Noob[]
The following guide assumes you know how to and already have set up an account and finished the tutorial.
Talk to the Quest Master (NPC located 3 tiles to the upper right of the chest in town). He will give you some quests to do in exchange for experience points or coins (and rarely, MOS, the premium currency). In addition, each quest gives 'quest points', which, as you accumulate them, allow you to begin more rewarding quests. Your current quest can be seen on the top of your screen, slightly to the right.
If you haven't already, you really should set up mods. I recommend selecting most if not all of them to begin with. The mod loader can be found under the main menu, the leftmost picture/icon on your game screen in the top right corner. Most players in chat will refer to you using the "/wiki" command, which brings up the in-game wiki (much more complete and up-to-date than the wikia), or the "/find" command, allowing you to find a mob, a mining/fishing spot, or a place in general.
The in-game minimap is small, pixelated (haha), and generally useful only to see your immediate surroundings. A detailed map of Dorpat can be found here, while the Dungeon (ladders heading downwards) can be found here.
Every so often, a message will appear in the middle of your screen, prompting you to answer a captcha. In return, you get a 'captcha point'. You can save 4 captcha points, but always spend the 5th captcha points, some people put them into Breeding before you start breeding, as this allows you to breed donkeys.
Bonus #2: You know that Repeat Quest Permission you got from the tutorial?, you can sell it on the player market.